
Make a Self-Watering Planter from a Plastic Bottle at Home
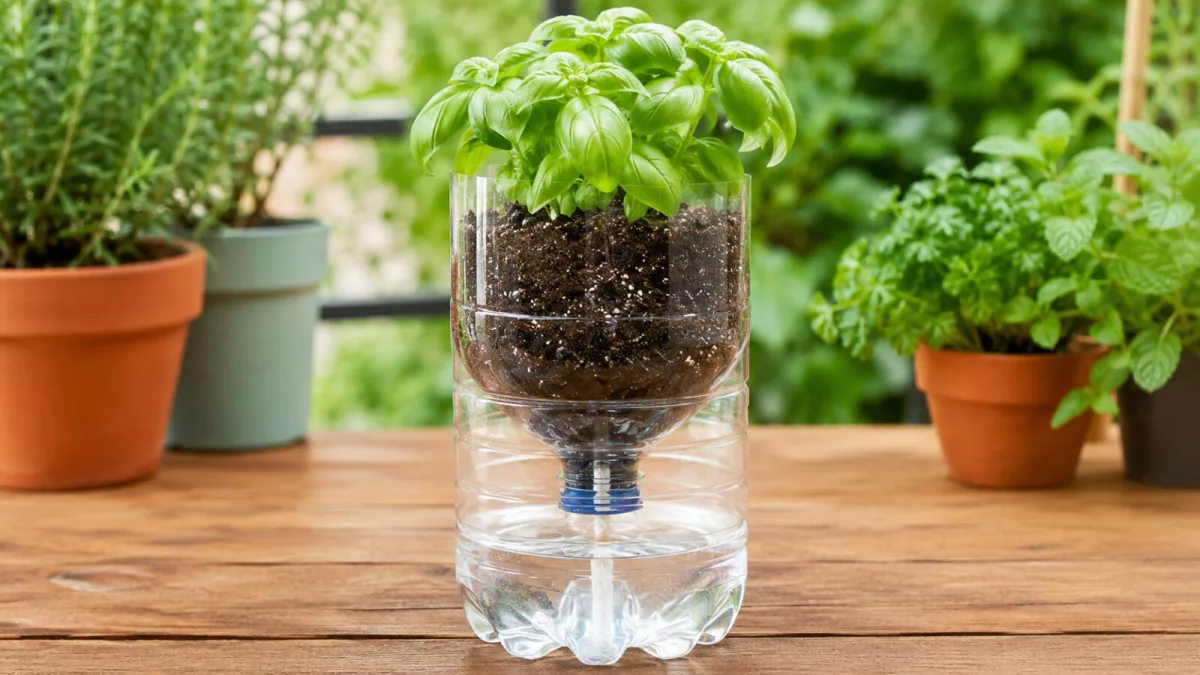
Recycling plastic bottles is one of the easiest ways to create a practical growing container at home for tomatoes, herbs, and leafy greens. A self-watering planter made from a 2-litre plastic bottle keeps the growing medium evenly moist, reduces how often you need to water, and prevents roots from drying out during hot summer weeks. The capillary wicking principle through an absorbent fabric is something even a complete beginner can set up in an afternoon on the balcony.
Why make a self-watering planter from a plastic bottle
Traditional plant pots have one major drawback: the compost dries out quickly. A self-watering system made from a plastic bottle solves this by letting the plant take up water on its own, according to what it needs at the time. The bottom reservoir holds enough water for several days, so daily watering becomes unnecessary, and the plant won’t suffer from either waterlogging or complete drought.
Other benefits include saving drinking water, because nothing evaporates through drainage holes or runs away. The material is free, the transparent sides let you visually check the water level and the root ball, and the whole setup takes up only a quarter of the space compared with standard shop-bought self-watering planters.
One 2-litre plastic bottle replaces both a pot and a saucer, and the reservoir in the lower section will usually keep a tomato going for three to five days without topping up.
What you’ll need
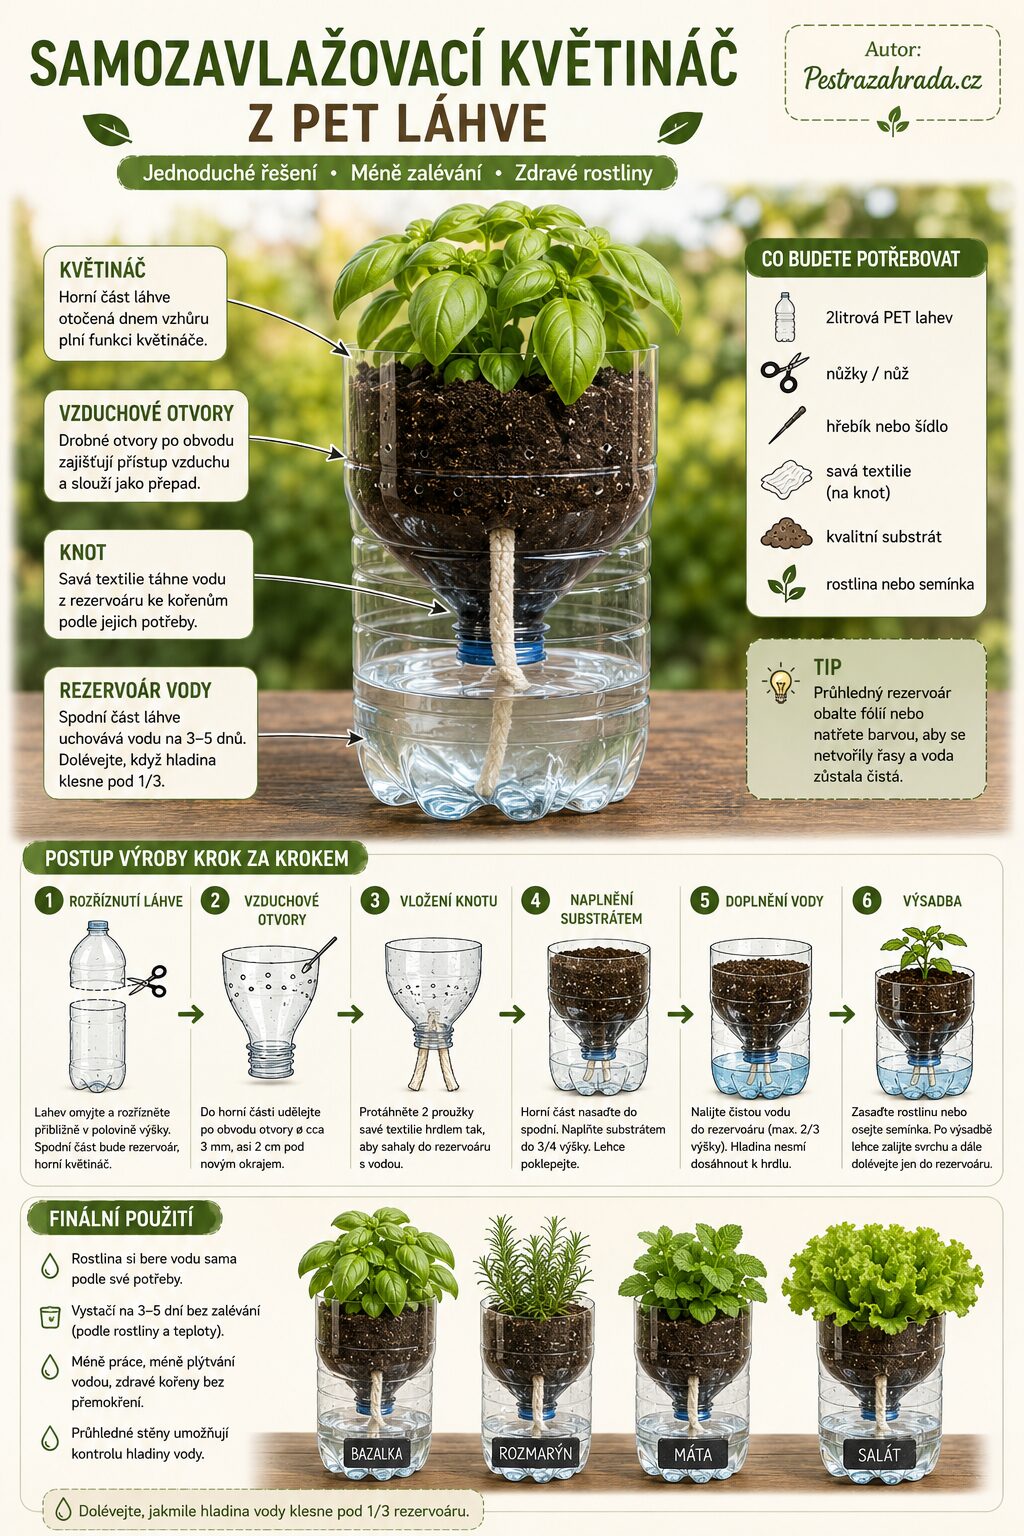
No special tools or expensive materials are required. You’ll need a 2-litre plastic bottle with straight sides, sharp scissors or a craft knife, a nail or awl to punch holes, an absorbent fabric for the wick, a good-quality growing medium, and of course a seedling or seed. Bottles with a deeply contoured base are slightly less suitable because the water level is harder to judge.
The right fabric for the wick
The key part of the whole system is an absorbent fabric that works like a wick, drawing water up from the reservoir to the roots. A nonwoven fabric such as Pellon Thermolam Plus, commonly used for patchwork and sewing, works particularly well. If you can’t get it, a strip of an old cotton tea towel, felt, microfibre, or a thicker nonwoven filtering fabric from the chemist will do a great job. Synthetic materials like polyester won’t form an effective wick, as the water simply slips off.
A growing medium tailored for self-watering
Ordinary garden soil isn’t suitable for self-watering systems, because once it absorbs water it compacts and restricts air reaching the roots. The best choice is a light, soil-free mix, such as peat and perlite at roughly a 2:1 ratio, with the addition of a palmful of organic fertiliser, compost, or worm compost. This mix holds moisture evenly throughout while still allowing air to reach the roots.
Step-by-step build
Cutting the bottle
Wash the bottle thoroughly, remove the label, and take off the cap. Using a sharp knife or scissors, cut it roughly halfway up, around 13 cm from the base. The bottom section becomes the water reservoir; the top section with the neck is turned upside down and becomes the actual planter. Keep the cut straight so the two halves fit snugly together later.
Punching ventilation holes
In the top part of the bottle, which becomes the planter once inverted, pierce a series of small holes about 3 mm wide using a heated nail or awl. Space the holes around the circumference about 2.5 cm apart, roughly 2 cm below the new rim. The holes allow air to reach the growing medium and also act as an overflow safety feature if the reservoir is accidentally overfilled.
Adding the wick
Cut two strips of absorbent fabric about 10 cm long and 2.5 cm wide. Thread both strips through the bottle neck so that on the inside they stick about 5 cm into the space where the growing medium will be, while on the outside they hang freely down into the reservoir. The wick must stay in constant contact with water; otherwise wicking stops and the plant will start to wilt.
Filling with growing medium
Insert the inverted top section (neck down) into the bottom half, which serves as the reservoir. Lightly moisten the growing medium before filling so it keeps air pores and wicking starts immediately. Fill the planter to about three-quarters of its height, tap gently to settle, but do not pack it down. Compacted growing medium loses its airiness and the wick can’t distribute moisture effectively.
Adding water and planting
Pour clean, dechlorinated water into the bottom section to about two-thirds of the reservoir height. The water level should never touch the neck of the upper bottle, otherwise the growing medium will become waterlogged. Plant your seedling or sow seed to the correct depth for the chosen plant. After planting, water once lightly from the top so the roots connect with the growing medium; after that, top up only into the lower reservoir.
How the system actually works
The principle relies on a physical process called capillary action. Water moves through the fine fibres of the fabric wick against gravity, much like it rises through a plant’s vascular system from roots to leaves. The growing medium draws up exactly as much moisture as it can hold, and any extra remains in the reservoir. The plant then takes up water evenly through its roots according to current demand, which is much closer to a natural regime than occasional heavy watering from above with a watering can.
A well-designed self-watering setup is virtually impossible to overwater, because the growing medium only draws up what it can hold and any surplus stays harmlessly in the reservoir below.
Which plants do best in plastic bottle planters
A 2-litre bottle has a limited volume of growing medium, so it’s best suited to plants with shallower root systems or young seedlings before potting on to their final home. Cherry tomatoes, peppers, strawberries, and herbs such as basil, parsley, mint, or chives are ideal for this format. It also works very well as a growing container for leafy crops like lettuce, spinach, or rocket.
For large-fruited tomatoes, aubergines, or cucumbers, a 2-litre bottle is simply too small. If you still want to grow them this way, use 5-litre bottles from spring water; the cut-and-wick principle is exactly the same, and the roots will have enough room to support a proper crop.
Tips for longer life and better harvests
Shading the reservoir
The clear sides of the lower bottle make it easy to check the water level, but they also let light in, which encourages algae growth in the reservoir. Wrap the bottom section in foil, black tape, or paint it with exterior paint. The water stays cleaner for much longer, the reservoir won’t heat up in the sun, and the roots will keep a comfortable temperature even in peak summer heat.
Regular nutrient top-ups
In a 2-litre volume, the growing medium becomes depleted quickly. Every two to three weeks, add a weakly diluted liquid fertiliser for flowering plants to the top-up water, or use nettle tea or worm compost extract. Don’t fertilise at full strength, or salts can build up in the wick and gradually block capillary action, taking the whole system out of use.
Monitoring the water level
Check the water level in the reservoir at least once every three days, and in hot summer spells even daily. Top up as soon as it drops below one-third of the volume. Never fill it right up to the neck, though, as the wick would be submerged along its full length and the growing medium would become overly saturated.
Common mistakes and how to avoid them
The most common mistake is using the wrong fabric for the wick. Polyester or nylon strips won’t wick water, so the wick must be made from an absorbent natural fabric or a suitable nonwoven material. Another frequent error is packing the growing medium too tightly; then it can’t breathe, and the wick can’t distribute moisture evenly into all parts of the planter.
People also often overlook water quality. Hard tap water gradually clogs the wick with limescale and reduces how well it conducts water. Rainwater is ideal, or at least leave tap water to stand in an open container for 12 hours. Lastly, the system won’t work properly without ventilation holes in the upper part, otherwise root rot and mould in the growing medium can develop.
Conclusion
A self-watering planter made from a plastic bottle combines thrift, sustainability, and practicality in a way that’s hard to beat with any mass-produced product. With just two hours of work, one sharp knife, and a handful of the right growing medium, you can create a small growing setup on a windowsill that manages soil moisture on its own and rewards you with a fresh harvest. For anyone who wants to start growing at home and is looking for a simple entry point into balcony gardening, this system is an ideal first step.
Source: Lovely Greens, Instructables, Pestrazahrada.cz

A lover of nature, gardens, and everything that moves, blooms, or grows. He literally grows everything, from herbs to rare species, and he enjoys caring for animals just as much. In his work, he connects modern technology with tried-and-tested grandmotherly methods and is happy when both paths lead to the same goal.
Related articles
How to Harvest, Cure, and Store Onions So They Last All Winter
Long-lasting onions are all about timing, gentle handling, thorough curing, and the right storage conditions. Follow these steps to keep homegrown onions sound and usable right through winter.

Invasive Plants That Can Land You in Trouble with the Authorities
Invasive plants are turning up more and more often in gardens and along fences, where they quickly crowd out native species and can be hard to eliminate. Some are also hazardous to people and animals, and certain species are monitored and controlled very strictly.
How to Choose the Perfect Watermelon Every Time
A great watermelon should be sweet, juicy and crisp, not bland and mealy. Learn the simple visual and touch-and-sound cues that help you pick a truly ripe melon at the shop or market.
Comments (0)
Be the first to comment.